Perfect for the busy Mum, this no-bake Piñata Cake, as seen in Issue 7 of HOORAY!, is so easy to make.
All you need is a few store-bought ingredients and you’re on your way to party perfection!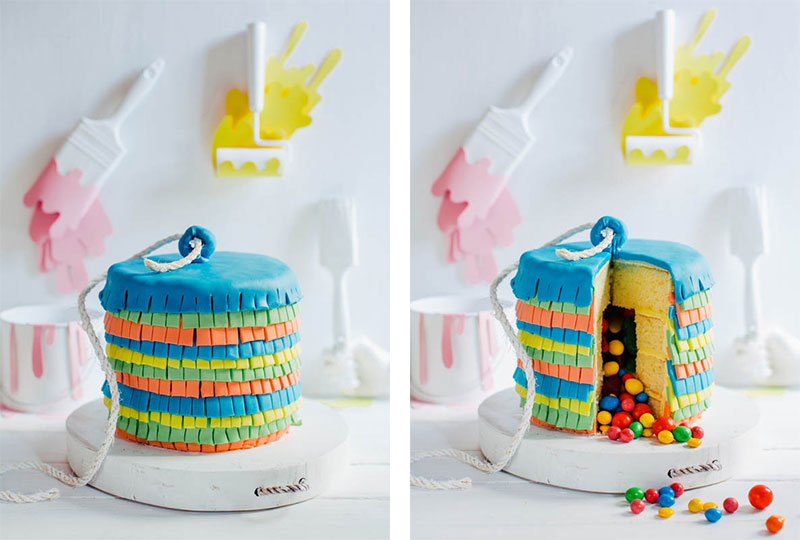
TIME
1 hour
SUITABLE FOR
Ages 12+
WHAT YOU’LL NEED
Buttercream (recipe here, or use store-bought ready-made icing) | 250g softened unsalted butter | 3 cups icing sugar | 2 x 600g packs ready-to-roll fondant | food colouring | 5 tbsp milk | 4 x Coles white chocolate mud cakes | mixed lollies
WHAT TO DO
- To make the buttercream, beat the butter in a stand mixer until white and creamy.
- Gradually add the icing sugar, occasionally scraping the sides to incorporate any sugar on the sides of mixing bowl.
- When half the sugar has been mixed, gradually add the milk, then slowly add remaining sugar.
- Divide the fondant into four 200g portions.
- Using a few drops of colouring at a time, knead each portion of fondant with desired colour until fully incorporated.
- Next, place two of the cakes side by side, and cut the centre of them out with a large round cookie cutter. Discard the centres.
- Ice the top of each cake with the buttercream.
- Place one of the uncut cakes on a platter, using a little buttercream underneath to secure cake to it.
- Then gently place the two cut cakes on top.
- At this point, carefully fill the centre with lollies. Then place final cake on top.
- Cover sides and top with remaining icing.
- Roll out one of the coloured fondant portions on a lightly sugared bench (using icing sugar).
- Roll to approximately 3mm thick.
- Then cut along with a ruler to make a section 3cm wide and approximately 40cm long.
- Make 1cm cuts along the bottom of the strip, all the way to the end.
- Cut 10cm lengths into the strip to enable easy placement on the cake.
- Pick up first strip and press gently on the side of the cake. Repeat with remaining strips until you meet back up with the first strip and the first layer is complete.
- Choose the next colour fondant and repeat the same process, pressing into the icing just above the first layer.
- Continue this process until the entire cake is covered.
- Roll out chosen colour for the top into a large circle, between two sheets of baking paper, allowing an extra 2cm to sit over the sides like a tablecloth.
- Gently remove the top sheet of baking paper from the fondant and place on top of the cake. Using scissors, make the cuts around the rim to match the rest of the layers.
- Use excess fondant to make a hook for the top if desired.
TIP
The coloured fondant can be made ahead of time and stored in individual zip-lock bags until needed.
Photography Hannah Blackmore | Styling Olivia Blackmore | Recipe Sarah-Jane Hallett
Piñata Cake